Design in the real copy
Figma's agent can call an MCP server, and LocalizeMe already runs one. Connect it once and a designer pulls the approved German into a frame instead of guessing at lorem ipsum, then pushes new copy back as keys the developer can export minutes later. Nobody retypes a string.
No plugin to install. The same endpoint every other client uses.
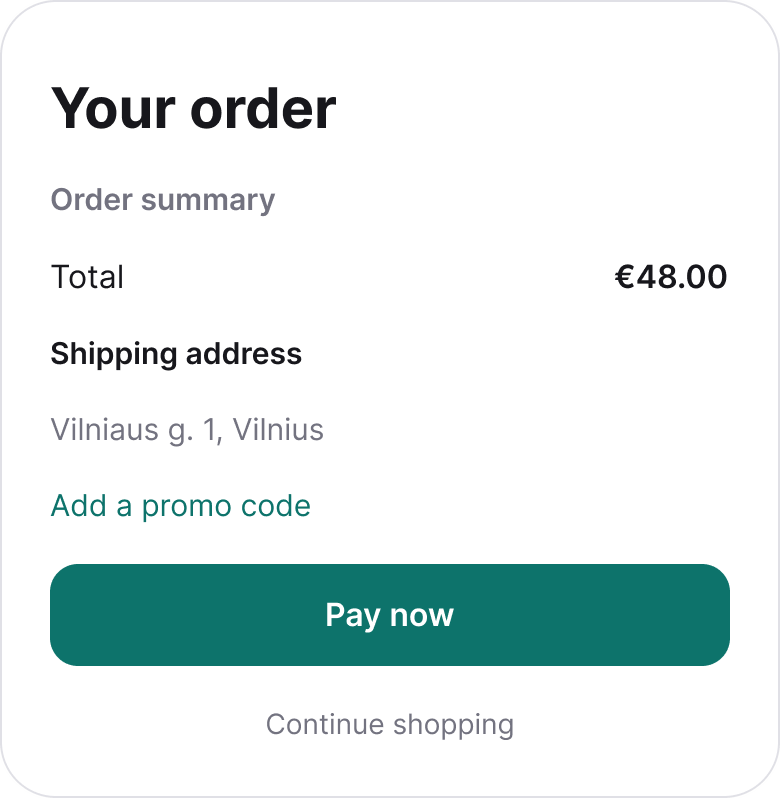
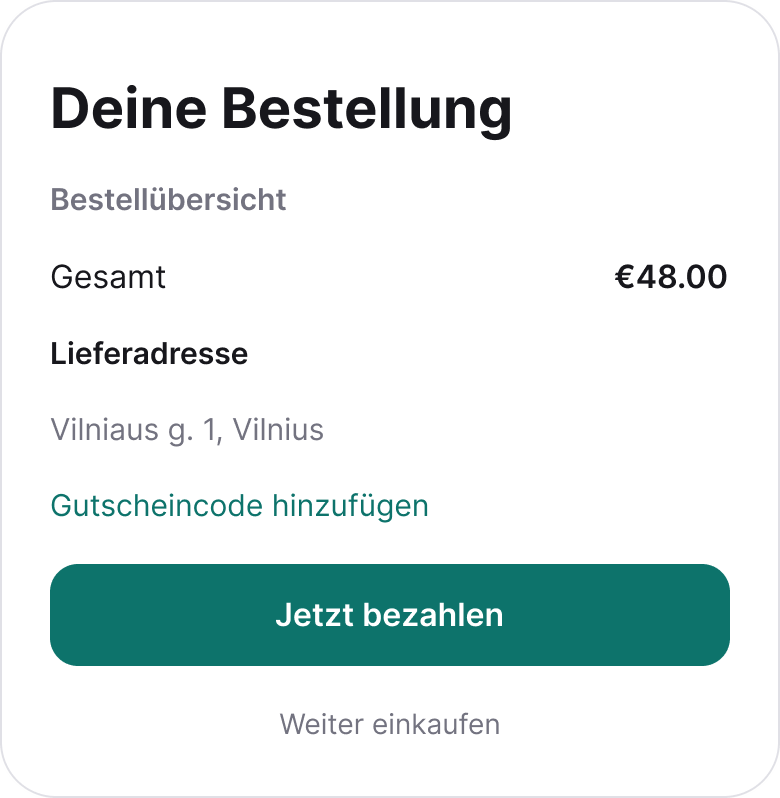
Seven layers matched a key and were swapped. The price and the sample address matched nothing, so they were left exactly as they were and listed back to the designer.
Seven steps, each with the screen you will be looking at. The LocalizeMe screens are captured from the app. The Figma dialogs are drawn label for label from the real ones, so the blue outline on each marks exactly what to click.
Add the connector
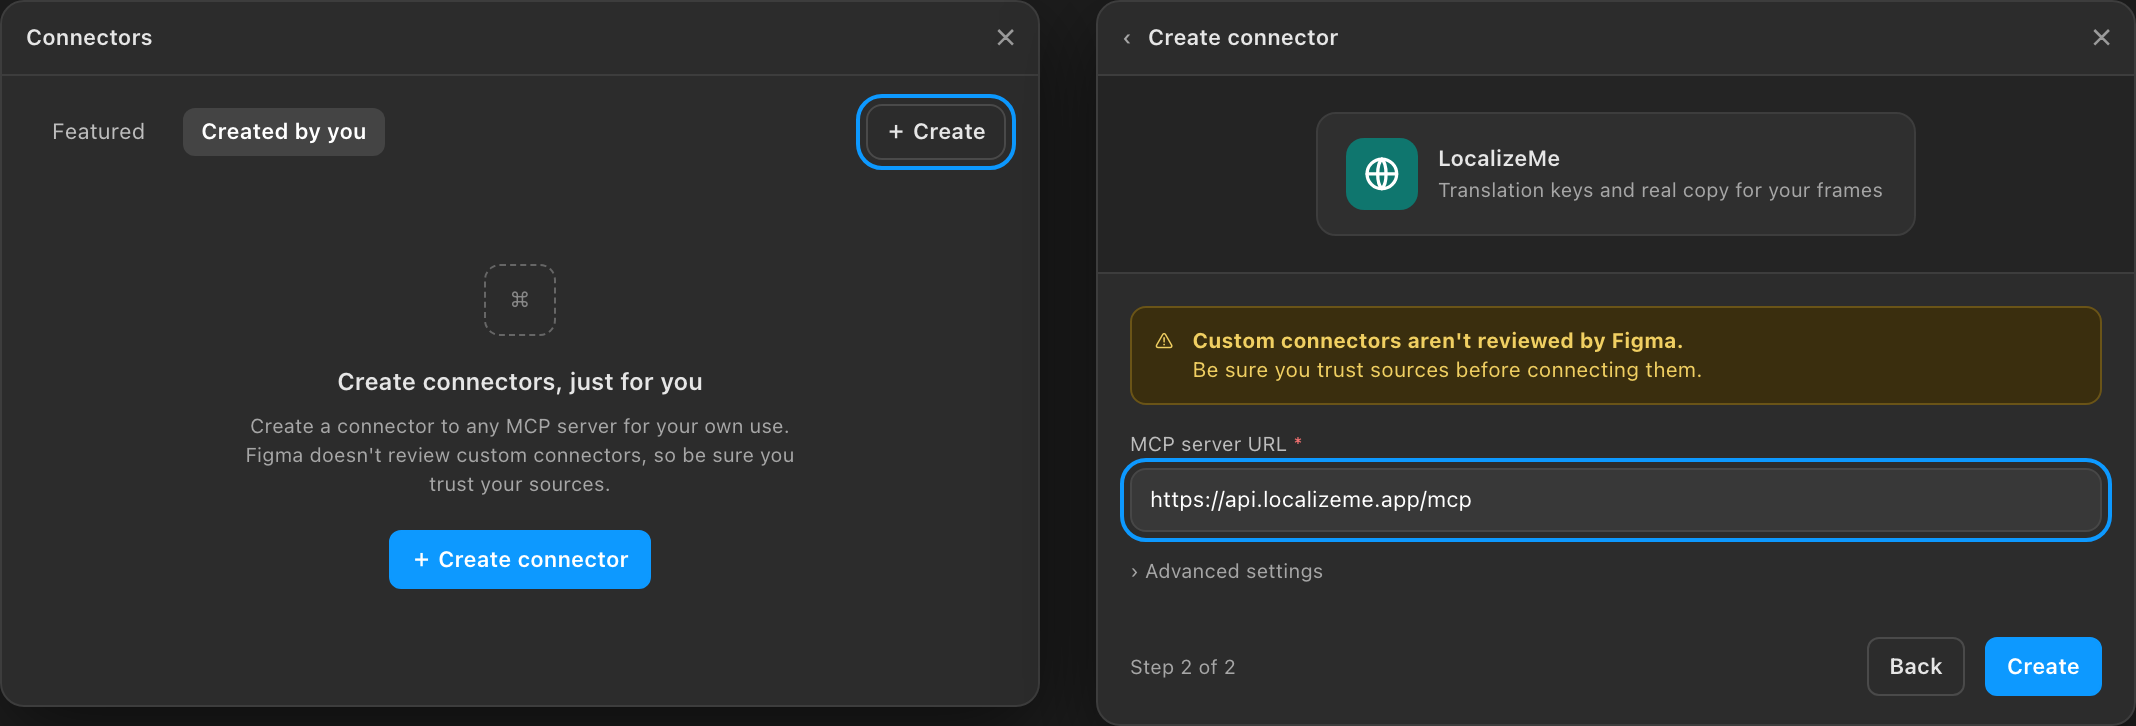
In any Figma Design or Figma Make file, open the agent and add LocalizeMe as a custom connector.
- Add context
- ›
- Connectors
- ›
- Manage
- ›
- Created by you
- ›
- Create
Inside the agent’s prompt box, in any Figma Design or Figma Make file.
- On the first page, name it LocalizeMe. Icon, tagline and description are optional.
- On the second page, paste the server URL below and leave Advanced settings closed.
- Click Create, then Connect on the connector that appears.
Custom connectors need a paid Figma plan and a Full seat. If the Create button is missing, that is the reason, not anything on the LocalizeMe side.
Sign it in
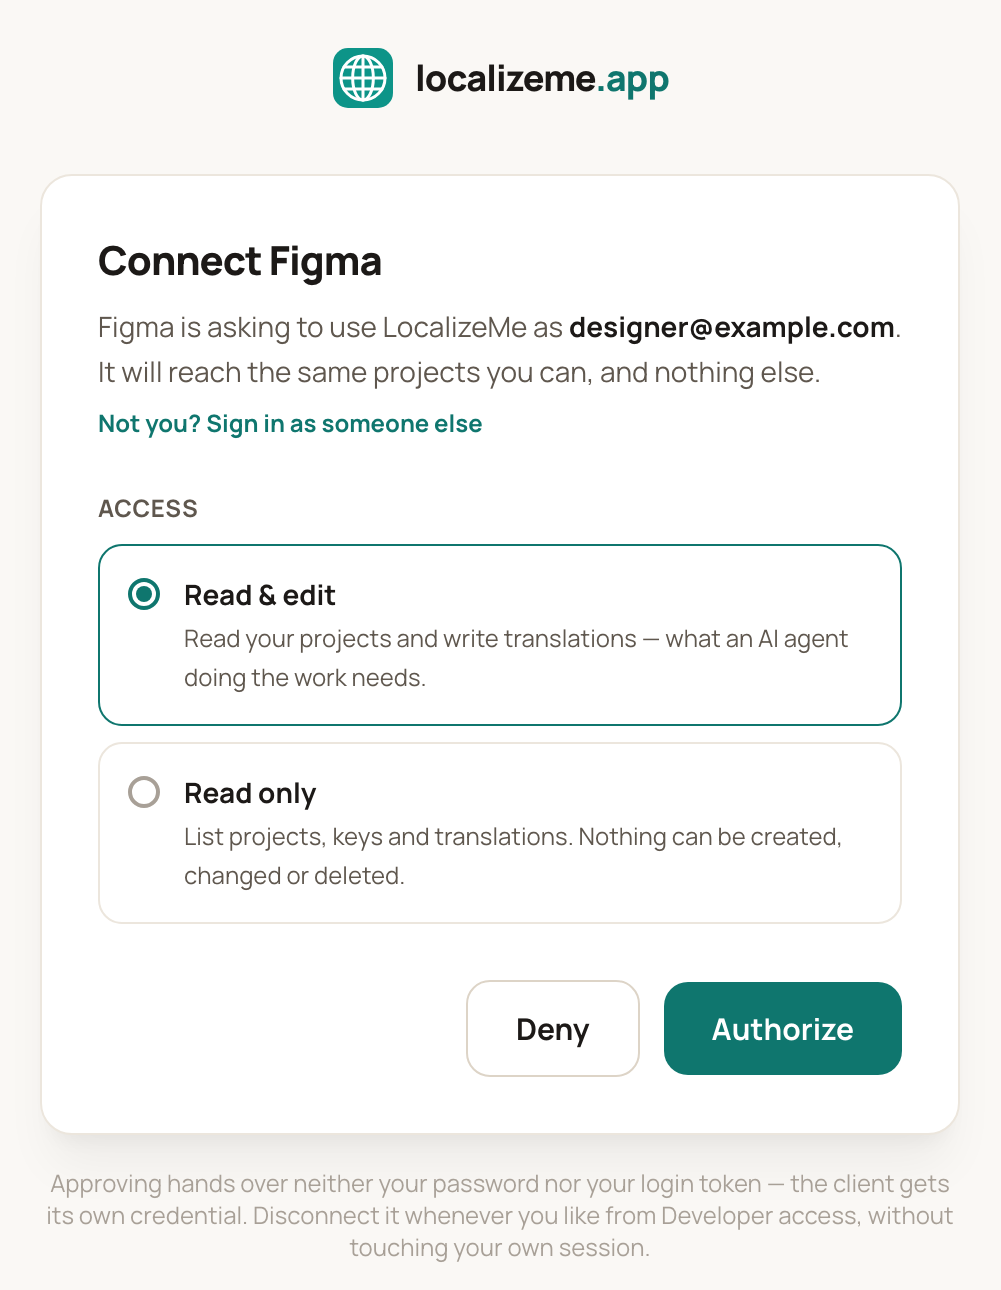
Clicking Connect opens this screen on localizeme.app. Approve it once and Figma keeps its own token.
Choose the access level
Read & edit if designers will push keys back. Read only is enough to pull copy, and the write tools are simply never offered to the agent.
Figma registers itself and lands here by itself; there is no client id to paste. The connector then acts as this one account and sees only its projects. If a project is missing later, you approved as the wrong account: disconnect in Developer access and connect again.
No browser to approve in?
An admin publishing one connector to a whole organisation can carry an lz_ key instead. In the dashboard: Developer access → Access keys → Create key, then in Figma, Advanced settings → Custom request headers, named Authorization with this value.
Bearer lz_YOUR_KEYTurn on the tools it needs
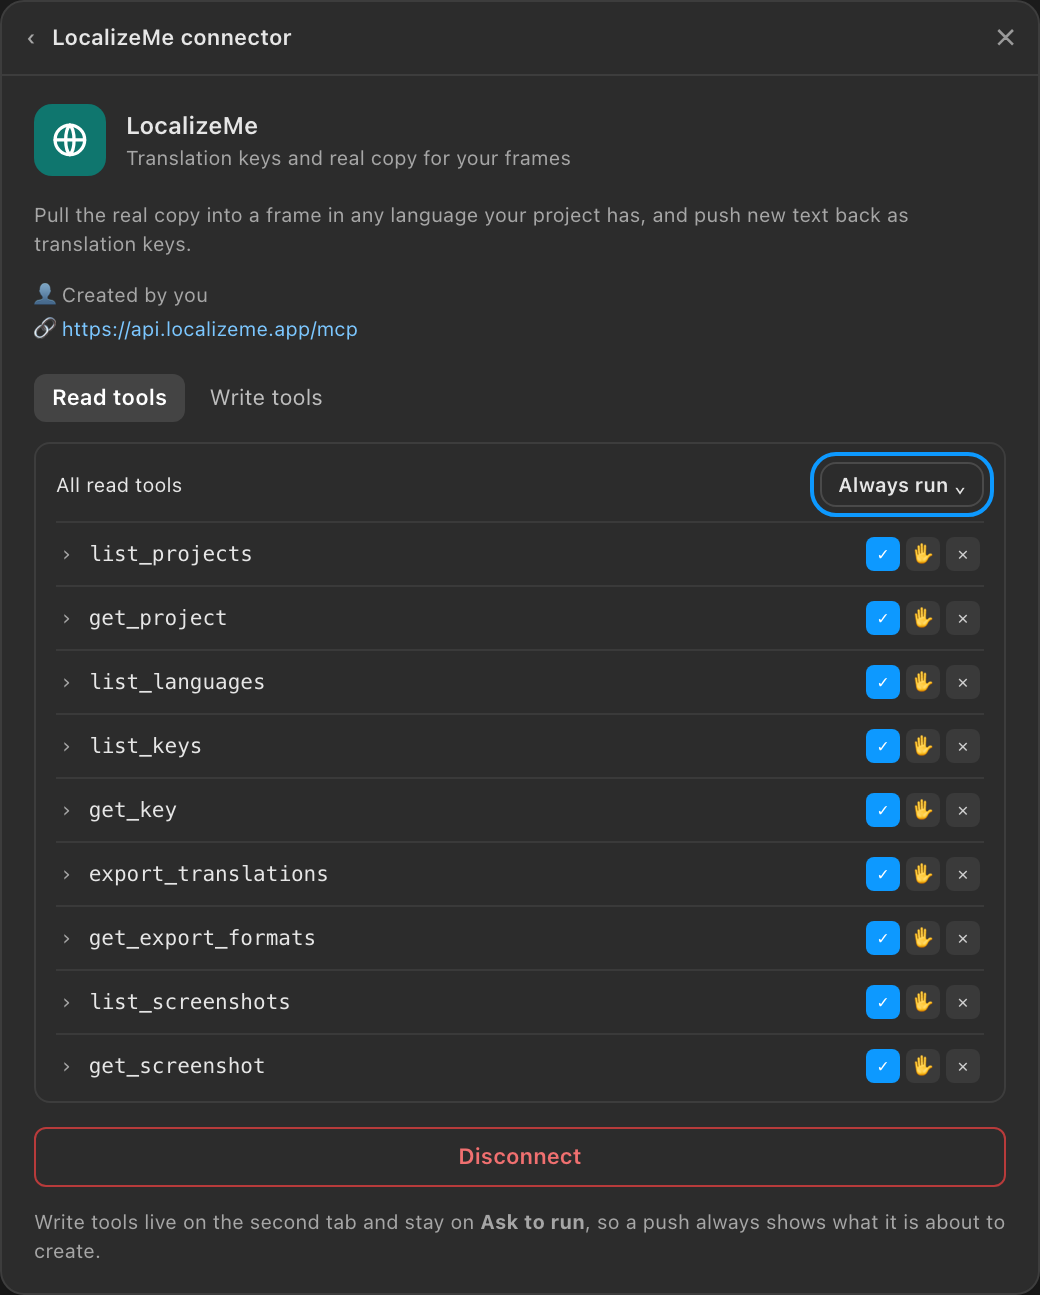
Open the connector’s Manage panel. Tools are split into two tabs, and the defaults are deliberately cautious.
- Add context
- ›
- Connectors
- ›
- Manage
- ›
- LocalizeMe
- ›
- Manage
Listing projects, keys, languages and exports. Set the whole group to Always run, or a single pull stops to ask permission three or four times before it reaches the copy.
Creating keys and writing translations. Leave these on Ask to run. A push then shows exactly what it intends to create and waits, which is what you want the first few times.
A tool set to Never run is not an error when the agent reaches for it. It answers nothing and carries on, so if a push reports it could not create a key, check this panel first.
Teach it the workflow
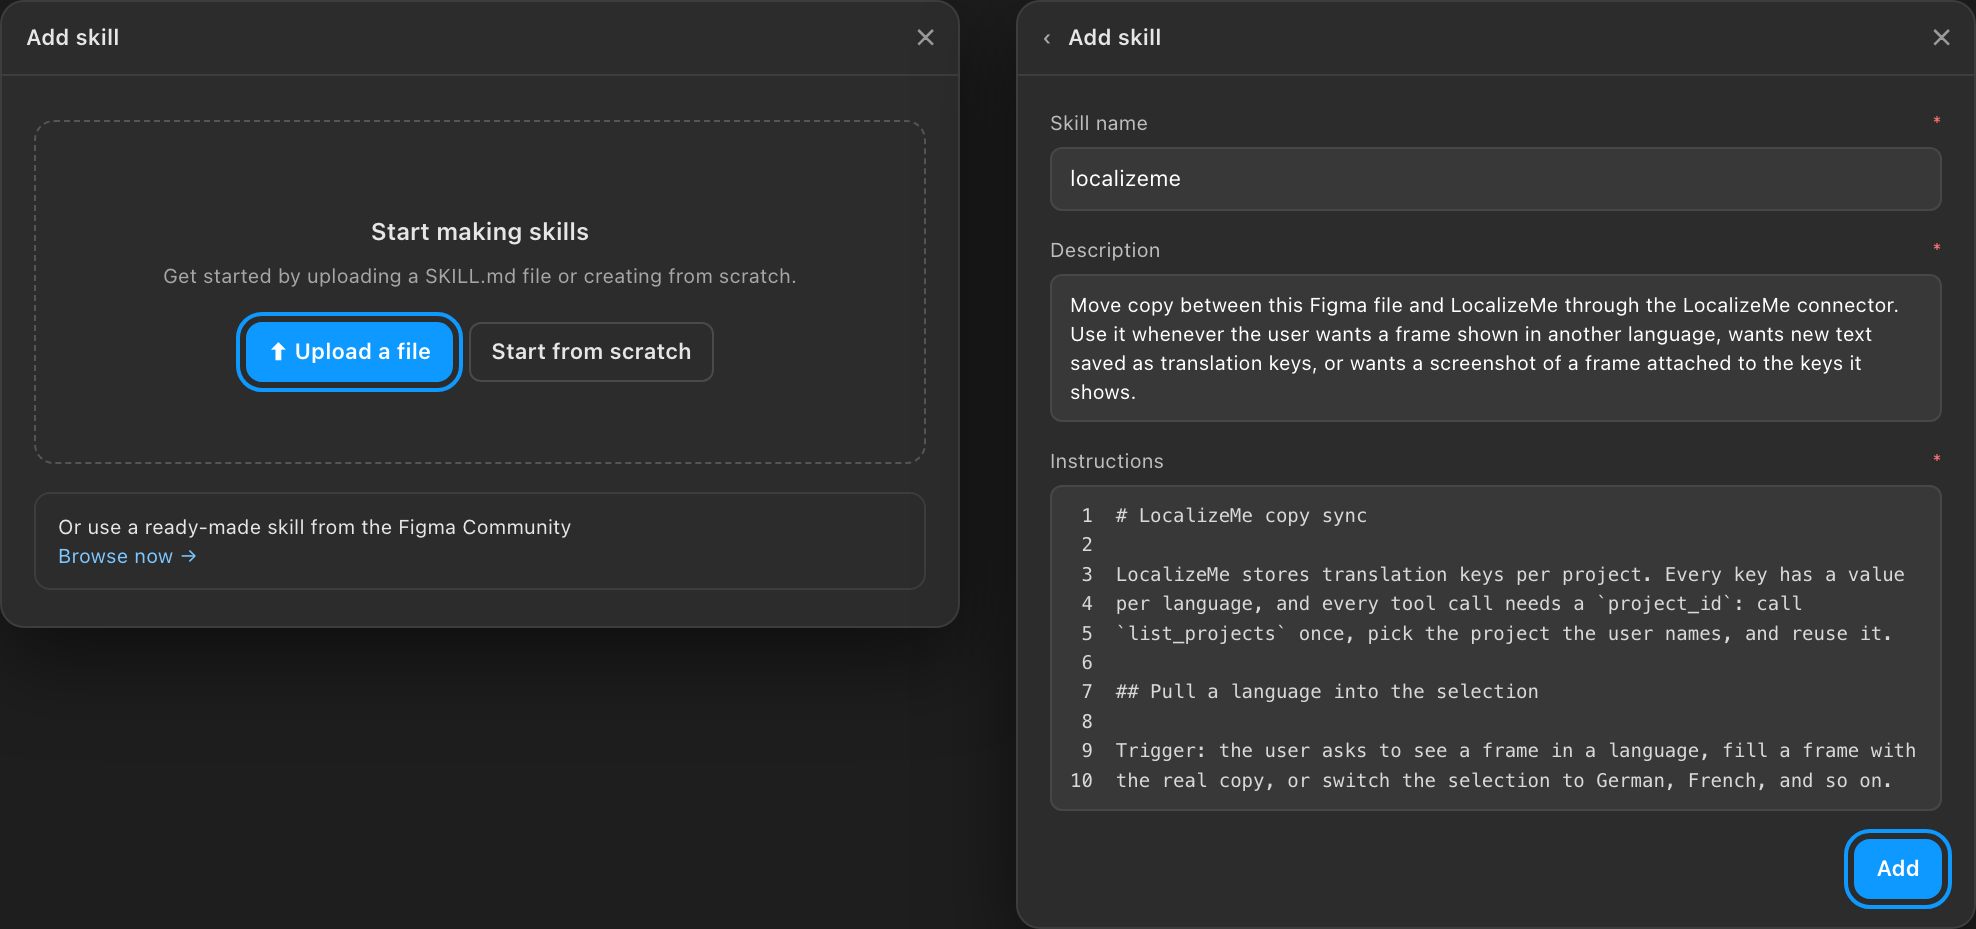
A skill is a short Markdown file that turns “match the layers to keys and pull the German” into one command the whole team runs the same way.
- Add context
- ›
- Skills
- ›
- Add skill
- ›
- Upload a file
Upload it, check the preview, click Add. It is now /localizeme in every file where the agent is available. You can also paste the text and let the agent adapt it to your own key-naming convention.
Pull a language into a frame
Select a frame, then ask. The agent reads every text layer, matches each to a key, and swaps in the value for the language you named.
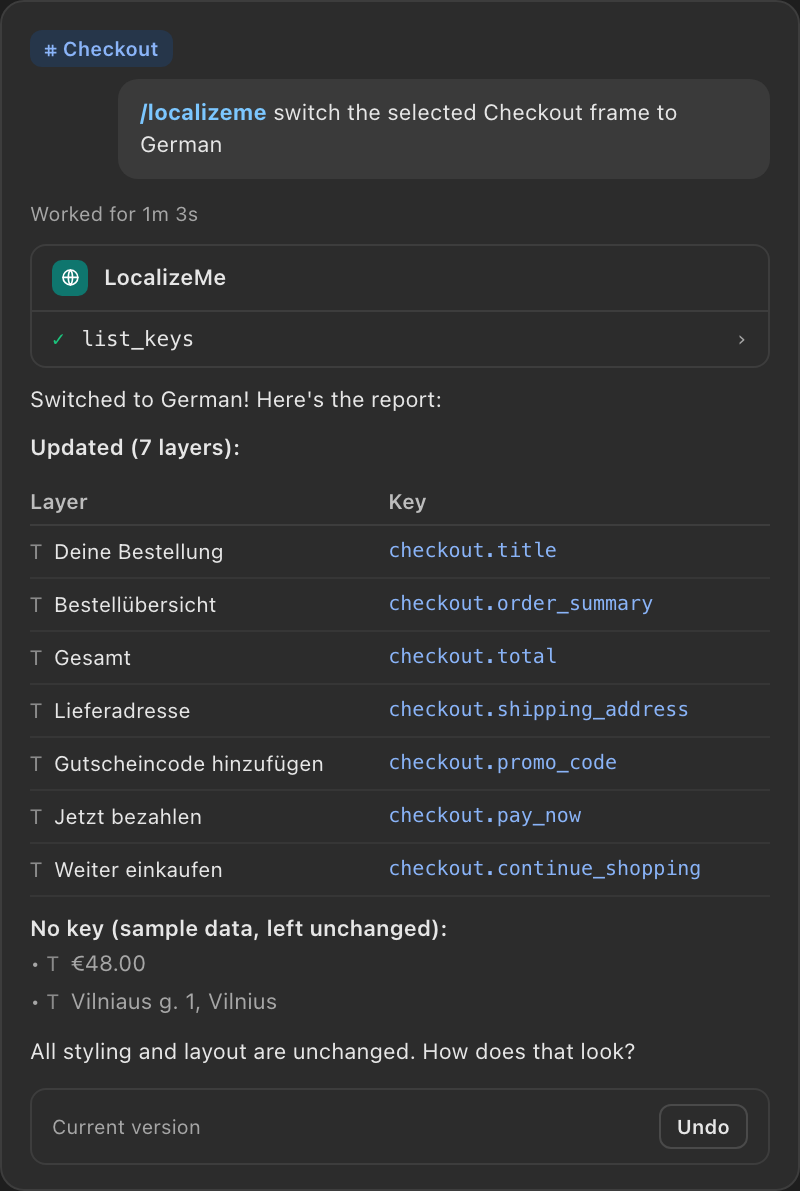
/localizeme switch the selected frame to GermanFont, size and layout are left exactly as they were. Each matched layer is renamed to its key, so from then on the key is visible in the Layers panel to anyone with the file open, no agent needed. The report comes back in three lists: layers updated, layers with no key, and keys still missing a value in that language.
A price, a sample address, a name: anything that matches no key is left alone and listed, so nothing is quietly overwritten. Text that no longer fits is reported rather than resized. Say “French” instead and the same frame switches again.
Where the key is visible, without asking the agent
Because every synced layer is renamed to its key, the key is simply the layer name. Any designer or viewer reads it in the Layers panel, in the selection header when the layer is picked, and in Dev Mode’s inspect panel. No connector, no prompt, no LocalizeMe account needed to look.
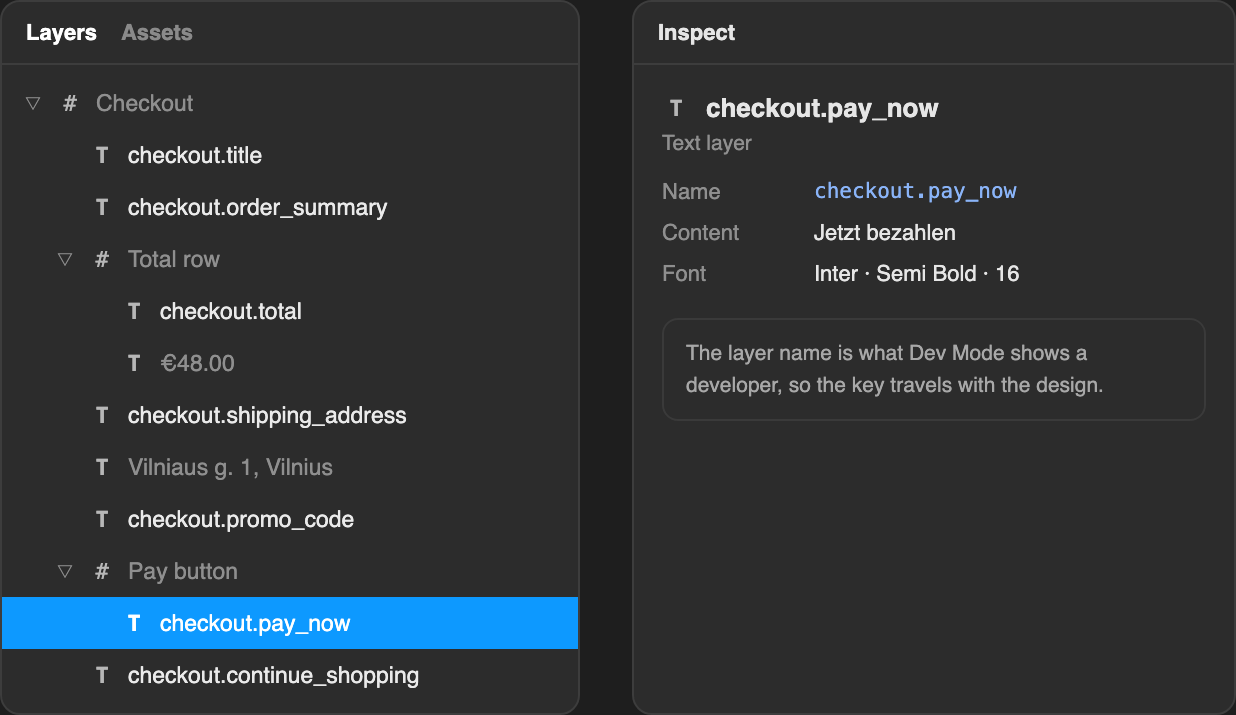
That last part is the useful signal. A layer still named after its text is a string LocalizeMe does not know about, so scanning the Layers panel tells a designer what is unmanaged before anyone runs anything.
The rename is also what keeps matching stable. Figma names a text layer after its content until someone renames it, so an untouched layer called “Pay now” becomes “Jetzt bezahlen” the moment you pull German and can no longer be found by name. Binding each layer to a string variable would put the key on the text property itself and make languages a mode switch, which is the natural next step, but it changes how frames are built so it is not what this guide does today.
Send new copy back as keys
Wrote fresh copy straight on the canvas? Push it up. The agent proposes a key per layer, shows you the list, and writes only after you approve.
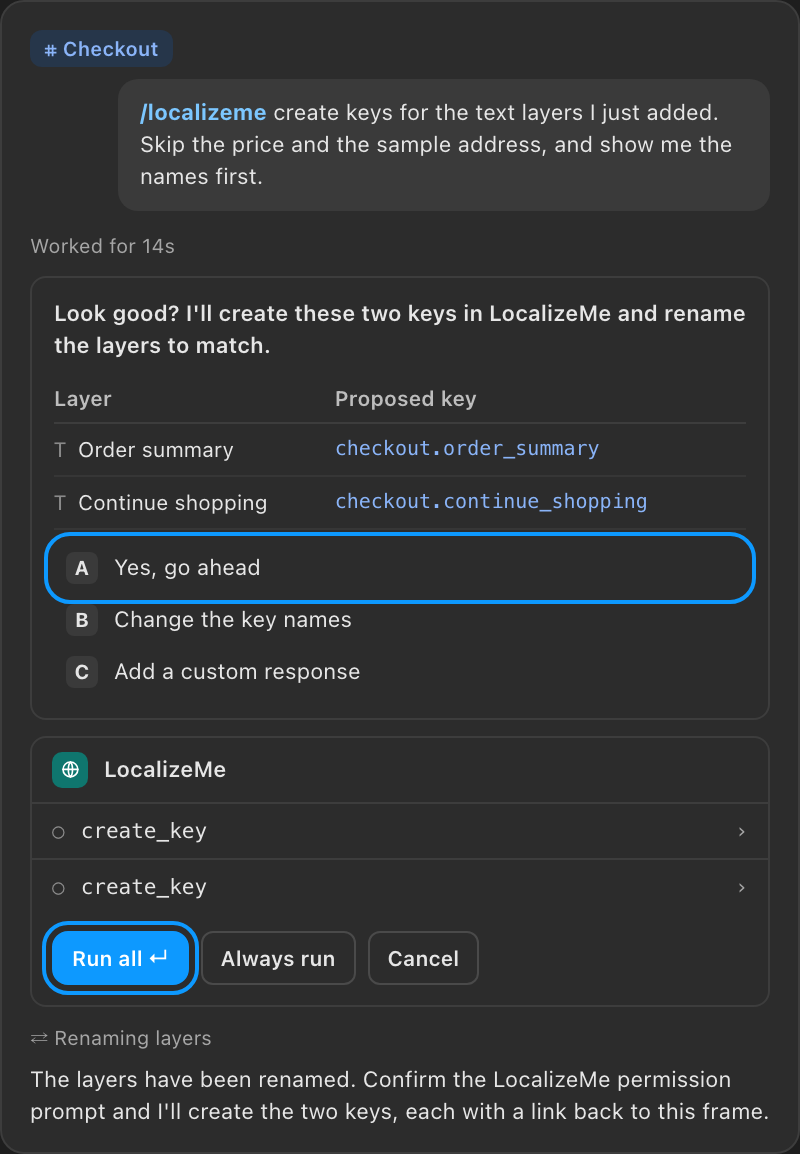
/localizeme create keys for the text layers I just added.
Skip the price and the sample address, and show me the names first.
It skips the things that only look like copy, such as a price or a sample address, names each key after the frame and the text, and renames the layer to its key so the next pull matches by name.
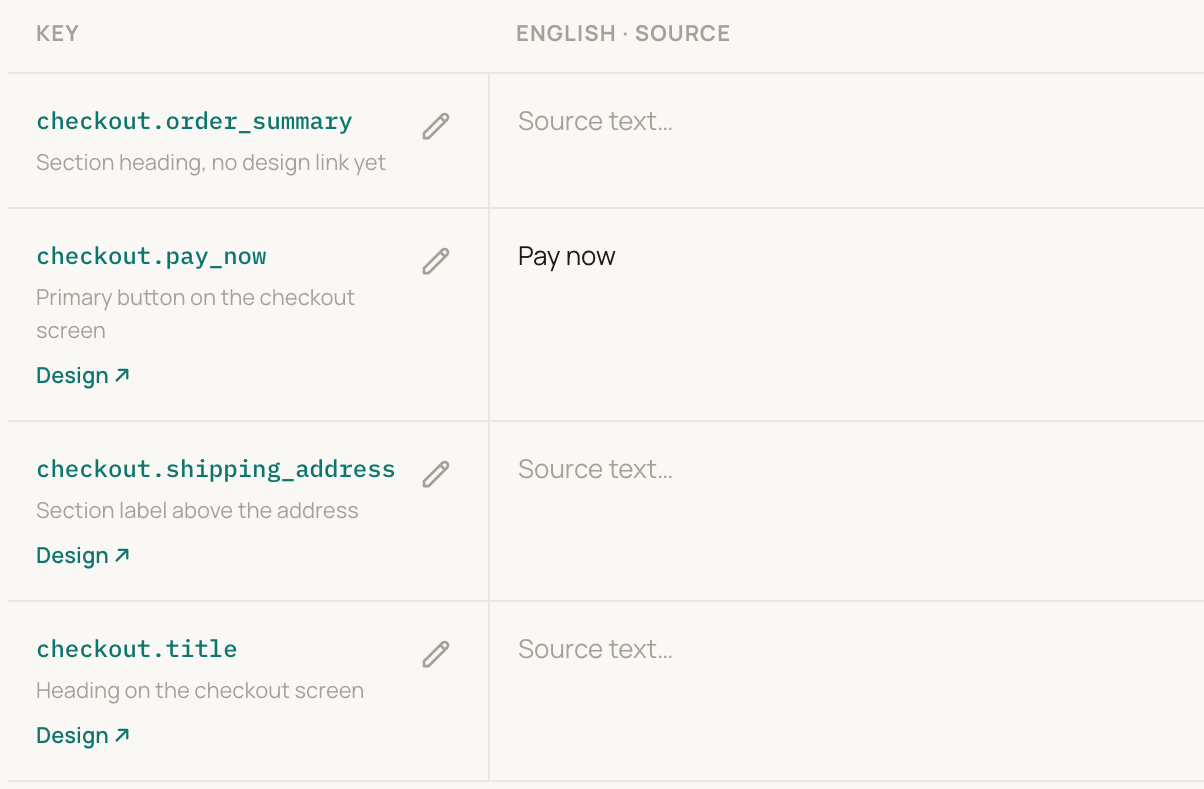
Each key is stamped with a link back to the frame it came from, which is the Design link in the next picture. Writing needs a read & edit connection, and Figma asks before each write tool runs unless you chose otherwise in step 3.
One key, in both places at once
Every pull and push renames each matched layer to its key, which pins it: Figma otherwise names a text layer after whatever it says, so a layer called “Pay now” would quietly become “Jetzt bezahlen” the moment you pull German. With the key as its name, a designer or a viewer reads the key straight off the Layers panel, and later pulls match by name. In LocalizeMe the key keeps a link straight back to the frame it came from.
The developer picks them up
Nothing has to be handed over. The keys the designer just created are in the project, so the next pull in CI has them. Same keys, same names, no copying.
# once, per repo
localizeme init --project 42 --format json --path locales

# in the build — the keys the designer made are already there
localizeme pull
Or the REST API, or the same MCP server from the developer's own editor. A key created in Figma is an ordinary key: it arrives marked as needing translation, so it shows up as work rather than silently shipping in English.
Worth knowing first
It sees the account you sign in as
The connector acts as whoever approves the consent screen, and shows only that LocalizeMe account's projects. If a project is missing, you are signed into the wrong account — not a connection fault.
Custom connectors need a paid Figma plan
The agent is free in beta, but adding a custom connector wants a Full seat on a paid Figma plan. On Starter the Add connector option is simply absent — that gate is Figma's, not ours.
Read is instant, edit is opt-in
Pulling copy needs only the read tools, on by default. Pushing keys needs the write tools, which you enable per connector — so a set_translations that answers nothing is a toggle, not an error.
One connector, shared or personal
A connector is private to whoever created it. On Organization and Enterprise an admin can publish it to everyone; on Professional each designer adds their own once.
Attach screenshots from the dashboard
Text moves through the agent quickly, but an image has to travel as base64 and Figma's sandbox makes that slow and unreliable. Ask the agent for copy, and upload frame screenshots from the project's Screenshots tab, where a drag and drop takes a second.
Cursor, Claude, ChatGPT, VS Code and the REST API